The cropping guide
How to batch crop images
To crop multiple images at once, add your files, choose one aspect ratio or exact output size, then review each frame and download the ZIP. You can also copy one crop area across a batch of screenshots.
Start with three steps: choose your images, set a shared crop, and download the results together. Use the guide below when you need matching pixels or the same region from every image.
Open the batch cropper ↗Jump to cropping the same area from screenshots, trimming edges by percentage, or the same-size cropper.
1. Decide what the finished images need to do
For a gallery or a set of thumbnails, a shared aspect ratio may be enough. A 1:1 frame is square, 4:5 is portrait, and 16:9 is wide. For a system that requires every file to be exactly 800 × 800 pixels, use an exact output size instead.
These settings answer different questions. The ratio determines the shape of the frame. Pixel dimensions determine how many pixels the exported file contains. A collection of square images can still have several different resolutions.
A useful starting point: choose a square crop for a uniform grid, then inspect the widest and tallest subjects first. If the frame would cut off a product or a person, you may need a different ratio or an image with more space around the subject.
2. Add the images you want to process
Open Batch Crop Images and choose several images from your device. On a computer, you can also drag files onto the image area. Use a few representative photos for your first pass: one landscape image, one portrait, and one with a subject close to an edge.
Local processing means the cropping work happens in your browser. Large source images still need device memory, so split a large collection into smaller batches if your browser slows down. Keep your source files until you have checked the downloads.
You can add up to 100 images. Each file is limited to 40 MB and 40 megapixels, and the whole batch is limited to 300 MB of source files and 150 megapixels. These safeguards do not guarantee that every device can handle the largest allowed batch.
After adding files, check the import report for how many were added and which files were not added. It gives a reason for each skipped file. A file that exceeds a limit does not prevent a later, smaller supported image from being considered.
3. Apply a common ratio or size
Select the frame you want across the batch. Shared settings establish consistency, but they do not know which part of each photograph matters to you. A centered crop may work well for one image and cut off a face in another.
For a mixed group of horizontal and vertical images, begin with the same ratio and review the preview on each image. If all files must have identical dimensions, select the exact width and height and look at the exported size before downloading.
4. Adjust each frame around the subject
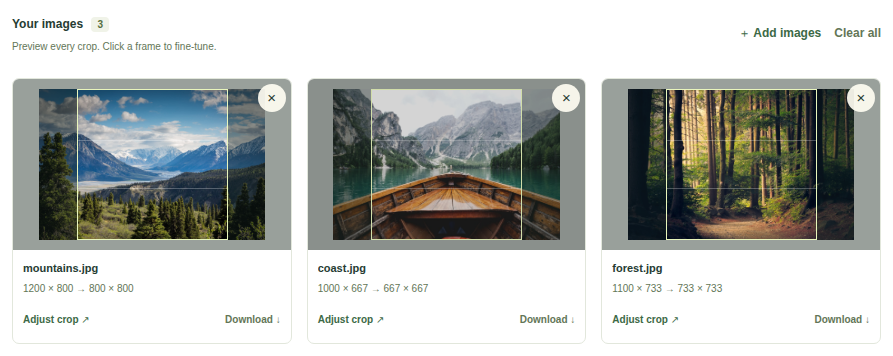
Move the crop position on any image that needs a different composition. Look for hands, faces, product edges, text, and other details close to the crop boundary. Similar positioning across a collection often matters as much as matching the ratio.
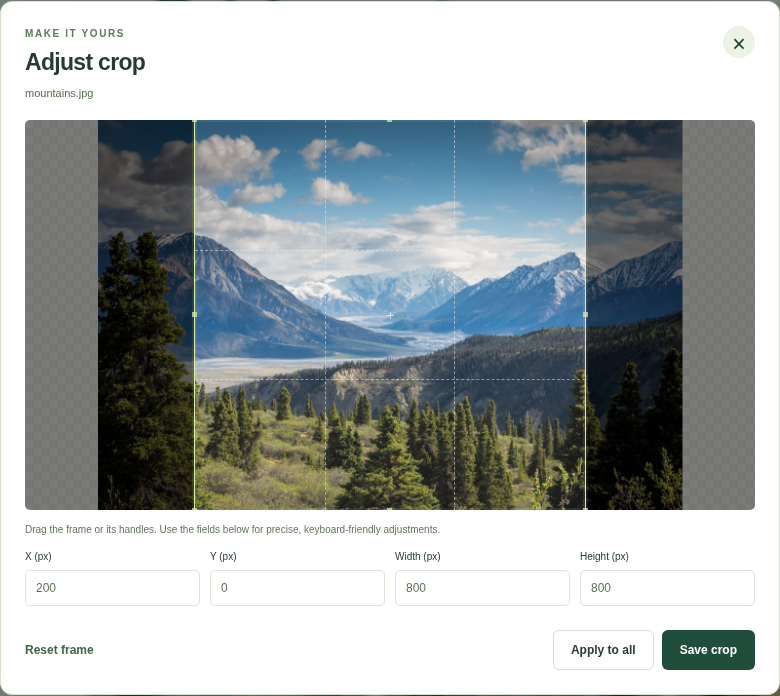
Click Adjust crop, move or resize the frame, and choose Save crop. Set your shared ratio, size, and shape first: changing those crop settings resets individual frames. Apply to all copies the adjusted frame's relative position and size to the other images.
- Product photos: keep the entire object inside the frame and aim for similar visual spacing.
- Portraits: leave enough space above the head and inspect faces near either edge.
- Screenshots: check that labels and useful controls remain readable.
- Gallery photos: review both the closest and widest compositions before applying the final settings.
A crop removes part of an image. If there is no way to fit the whole subject inside the target shape, changing the ratio or using a different source photo is better than forcing an unsuitable crop.
5. Choose an export format and download the batch
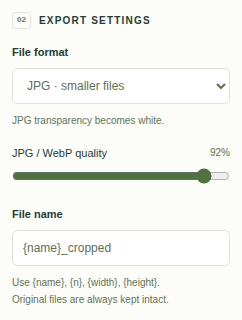
Use JPG for ordinary photographs when a smaller file is useful. PNG is a practical choice for graphics that need transparency or crisp flat-color edges. WebP can be useful for web images; confirm that the place you will publish the files accepts it.
JPG, PNG, WebP, GIF, and AVIF imports depend on your browser's decoding support. GIF imports are exported as still images using the first frame. With Keep original format, GIF and AVIF export as PNG; you can instead select JPG or WebP for rectangular crops. Circle and rounded-corner crops always export as PNG with transparent corners. HEIC, RAW, and ZIP imports are not supported.
The export is newly encoded. Original EXIF and other embedded source metadata are not copied into the cropped file. JPG export fills transparent areas with white. Each output is limited to 8,192 pixels per side and 32 megapixels, and a ZIP export stops if the accumulated output exceeds 300 MB.
Export the cropped images together and save the ZIP. Extract it before uploading the images somewhere else. Open a few results, inspect the pixel dimensions, and check the small details at normal viewing size.
Crop the same area from multiple screenshots
Suppose you have several 1200 × 800 screenshots with the same layout. You want only the 1000 × 600 content area, starting 100 pixels from the left and 80 pixels from the top. Set the crop once and apply it to the other screenshots.
- Open the cropper in Free ratio mode, keep Rectangle selected, and add screenshots with the same dimensions.
- Open Adjust crop on the first image. Set Width to 1000, Height to 600, X to 100, and Y to 80.
- Choose Apply to all, then check each preview. The example produces a 1000 × 600 crop from each 1200 × 800 screenshot.
- Choose PNG to avoid lossy compression of screenshot text, then download the ZIP.
Equal source dimensions matter: Apply to all copies relative crop position and size. With different source dimensions, it does not copy identical pixel coordinates. In Free mode, the same example applied to a 2400 × 1600 image selects X = 200, Y = 160, Width = 2000, Height = 1200.
Set shared settings before adjusting the frame. Changing them afterwards resets individual crops. This workflow keeps a chosen region; it does not detect content automatically or split several photos out of one scan.
Trim the same percentage from every image edge
Choose Trim edges when you want to remove a proportional border. For a 1200 × 800 image, entering 10% on all four edges removes 120 pixels from each side and 80 pixels from the top and bottom, leaving 960 × 640 pixels.
Different source sizes lose different numbers of pixels. This is a manual percentage trim, not automatic white-border or transparent-border detection. Review the previews before exporting.
A short check before you publish
- Every image uses the intended shape, and exact-size exports have the required width and height.
- No faces, product edges, or essential text have been cut off.
- Transparent areas look correct in the selected export format.
- Small originals have not been enlarged more than your use case can tolerate.
- The ZIP contains the expected number of images.
Try it with your own images
Choose a small batch, establish a shared frame, and fine-tune the photos that need a different position.
Start batch cropping